Your cart is currently empty!
Rainwater System Setup Guide

Prep Time:
2 hours 30 minutes
Active Time:
4 hours 30 minutes
Additional Time:
45 minutes
Total Time:
7 hours 45 minutes
Materials
- 3 x 55-gallon plastic drums
- 2x4x8 boards: 13 pieces
- 1x4x8 boards: 3 pieces (~$6.43 each)
- #8, 2½” screws (~$5.97/lb)
- #8, 1½” screws (~$7.98/100-pack)
- 10 ft of ¾” PVC pipe
- 2 ft of 1″ PVC pipe
- Adapters, elbows, tees, and bushings
- Bung wrench
- Threaded hose bib (spigot)
Tools
- Drill (with drill bits and drivers)
- Saw
- Square
- Level
- Wrenches
Instructions
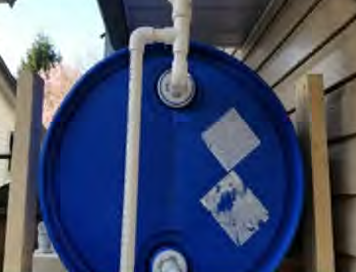
<ol><h3><strong>Frame Construction</strong></h3></ol><ol><li><strong>Cut all wood to size</strong> according to the cut list.</li><li>Double-check your measurements!</li><li>Sketch a plan if you need to adapt to your space.</li><li><strong>Build the bottom shelf</strong>:</li><li>Attach 32″ braces (place 13″ inside from the edges).</li><li>Ensure the frame is square and level.</li><li><strong>Assemble the other two shelves</strong>:</li><li>Use the same method to build two more frames for the upper shelves.</li><li><strong>Create barrel cradles</strong>:</li><li>Place a barrel on the bottom shelf.</li><li>Add 29″ angled supports and 10″ cradle boards to snugly fit the barrel.</li><li>Secure with screws after drilling pilot holes.</li><li><strong>Attach legs</strong>:</li><li>Secure the 84″ legs to the bottom shelf.</li><li>Stack and attach the second and third shelves to the legs.</li><li>Space shelves 24½” apart for proper drum fit.</li><li><strong>Finalize frame assembly</strong>:</li><li>Stand the rack upright.</li><li>Slide drums into their cradles to confirm the fit.</li></ol><h3><strong>Plumbing the Barrels</strong></h3><ol><li><strong>Prepare the drums</strong>:</li><li>Install bung caps on each drum.</li><li>Attach a spigot to the bottom drum bung cap.</li><li><strong>Connect the barrels</strong>:</li><li>Add adapters and a short PVC pipe section (2″) to other bung caps.</li><li>Use 90° PVC elbows to connect barrels in series with ¾” PVC pipe.</li><li><strong>Add overflow pipe</strong>:</li><li>Attach a tee to the top drum.</li><li>Connect a short PVC section from the tee to a 90° elbow.</li><li>Run a pipe from the elbow to the ground as an overflow outlet.</li><li><strong>Connect to the gutter system</strong>:</li><li>Use 1″ PVC pipe with 45° elbows to route water from the gutter to the top drum.</li></ol><h3><strong>Optional Modifications</strong></h3><ul><li>Use <strong>clear hoses</strong> for water-level visibility instead of PVC pipes.</li><li>Install <strong>mesh filters</strong> on the inlet to block debris (check and clean regularly).</li><li>Consider a <strong>continuous pipe connection</strong> from the lowest bung cap to the highest bung cap for better airflow.</li></ul>
Notes
Lumber Cut List
For Frame Assembly
- 4 x 84″ (legs)
- 12 x 32″ (shelf braces)
- 6 x 29″ (angled supports)
- 24 x 10″ (angled cuts for barrel cradles)
For Barrel Cradle Support
- 6 x 35″ (1×4 boards for supports)
Why Use a Rainwater System?
- Storage Capacity: Holds 165 gallons of water.
- Versatile Use: Great for gardening or emergency water needs.
- Sustainability: Reduces reliance on drinking water for household tasks.